
Gravity Dropper Turbo LP Seat Post: Reviewed
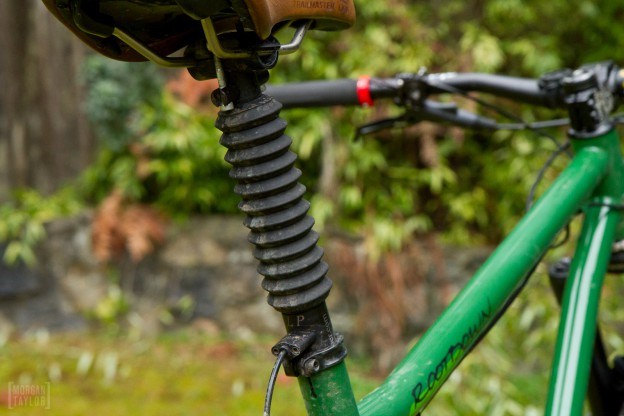
Gravity Dropper was the first to bring a dropper post to market, way back in 2003. In over a decade the mechanical design hasn’t changed a whole lot, and as a result it has a reputation as one of the more reliable and easily serviced posts out there – a point that is bolstered by their friendly and quick customer service out of Montana. The other thing that hasn’t changed much is aesthetics, which can be a sticking point for some riders.
The Turbo LP, introduced last year, is a refined version of Gravity Dropper’s venerable design, using the same cable-actuated locking pin with a coil spring for the up-down function. The Turbo LP is available in 5” drop for larger (30.0+) post diameters, and 4” drop for smaller posts. The unit tested here is the 5” drop, 31.6 diameter post, with a 1” drop for the middle position and a 420mm overall length.
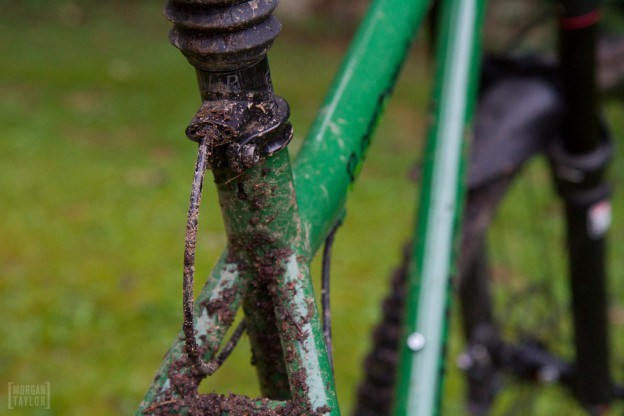
Having ridden the 4” 27.2 Turbo previously, I was familiar with the workings of the post and looked forward to trying the updated version. Out of the box, the Turbo LP is a nice piece of equipment: quality machining with a solidly designed two-bolt post head. The lever design remains the same as the old post while the Turbo unit (where the cable goes into the post) has been rotated 90º. Another interesting update is the use of custom-made 4mm brake housing rather than 4mm shift housing (normal brake housing is 5mm).

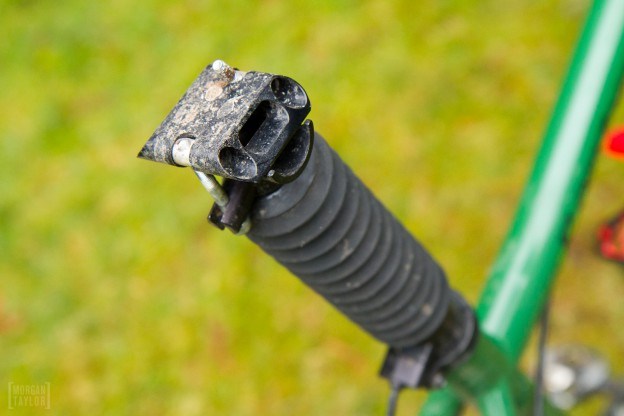
The Turbo unit, where the cable enters the post, has been rotated 90º. Gravity Dropper recommends installing the post in the orientation seen here for strength and cable protection, but it still functions fine oriented forward.
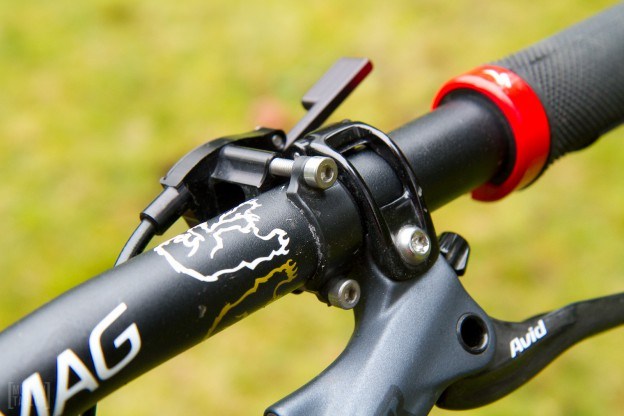
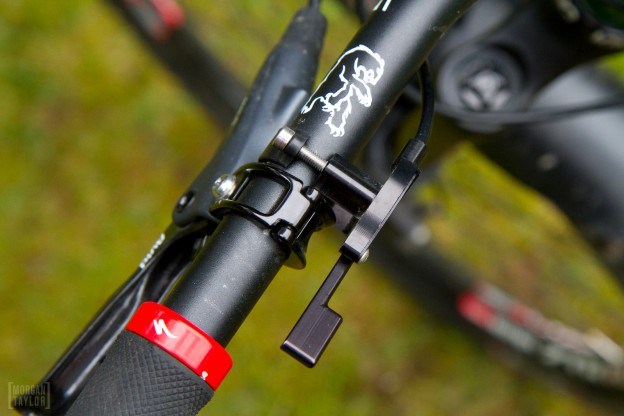
Having spent a fair amount of time on this post and the previous 4” version, I do have a couple of nitpicks about the design. While the lever is aesthetically unrefined, it does function as required. Cable tension is adjusted by removing a plate from the lever and undoing two microscopic (0.5mm allen) set screws. In theory you set it and forget it, but in reality some external adjustment would be great. Whether through a bad initial install or cable stretch, there’s a reason barrel adjusters are still standard on brakes and shifters.
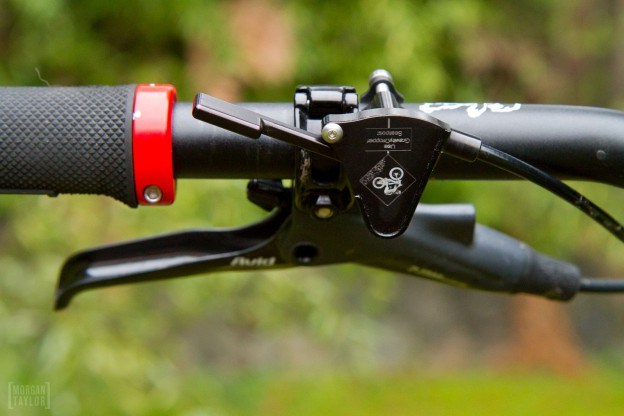
The lever design functions fine, but could definitely stand to be updated. Hackers appear to be using other companies’ levers, which is a good sign.
Almost everything about the Gravity Dropper product has a made-in-USA quality about it, so I was surprised to see the fragile plastic lever clamp still in use. This piece was hanging on by a thread on my old Turbo, and I shattered the one on the Turbo LP the second time I moved the lever. Fortunately Gravity Dropper supplies a spare. Beyond these complaints I’m not a huge fan of the lever itself, and having seen a friend successfully hack a Fox DOSS lever into use with his Gravity Dropper, I am all for exploring alternate options.
I do also have to take issue with the claimed weight. Gravity Dropper’s site claims the Turbo LP comes in at 460 grams with hardware, 45 grams lighter than the original Turbo. Now, the 31.6x420mm model would be the heaviest one they make, but my particular sample weighed in at 666 grams with the cable and lever. I also happened to have that old 27.2x420mm post handy, and it weighs 556 grams. I’m not sure where the published number comes from, but 200 grams is certainly not insignificant.
On the 5” drop post, the distance from the seat rail to the bottom of the Turbo unit – which limits how deep you can install the post in a frame – is about 8”. Comparatively, the Fox and RockShox offerings are about 7.5”. For most riders this will not pose a problem, but I was close to the limit on frame with a 20” seat tube. I would not be able to use flat pedals on this bike without a lower profile saddle on the Turbo LP. It bears mentioning that I have a friend whose stubby legs put him in a similar position with a 5” Reverb. Your mileage may vary.
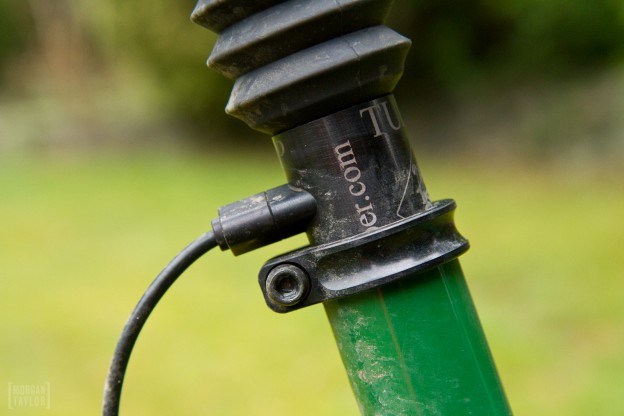
The Turbo unit sits about 1/2″ lower than other dropper posts, limiting how far you can lower your seat.This is my post height with SPD cleats near the middle of the slots. Flat pedals wouldn’t work for this particular setup.
Out on the trail, I was running into two problems, both of which I deduced stemmed from the boot. Now, I’m not actually opposed to the look of the boot on a hardtail – in a way, I find it entertaining. But, as was noted by a friend as this build came together, “there’s something amiss when an 11-speed drivetrain gets put together with the boot from a 1998 Judy XC”. That’s a good point considering how fickle we mountain bikers can be about the aesthetics and overall feel of our bikes.
The first sticking point (literally) with the boot was in attempting to get into the full drop position. The 5” boot is more robust than the old 4” version and takes up more space. In order to allow the post head to lower all the way, the boot itself has to slip off its retaining groove, down to rest on the Turbo unit. NSMB tester Omar Bhimji noted that it “seems there’s just too much boot for the system to deal with at full drop.”
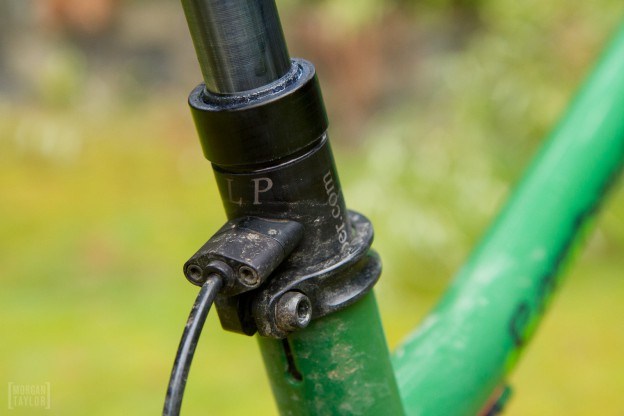
With the boot removed, you can see the unsealed adjustable collar, and right below it, the groove for the boot. When in the 5″ drop position, the boot sits right on top of the Turbo unit. Unscrew the collar and you can access the internals to do a basic service to the post.
Most of the time, far more than an acceptable amount of effort was required to get the seat down into the bottom position. I noticed this most when I had dismounted and lazily wanted to lower my seat before jumping back on – it just wouldn’t happen. No amount of arm pressure was sufficient to overcome the friction – I had to sit on it, and hard. The boot was quite simply getting stuck between the post head and the lower tube.
The second issue was with the post returning to its top position from the middle position after it had been all the way down in the 5” drop position. As I mentioned above, the boot has to pop off its groove to allow the post to go all the way down. In going back up to the middle position, the boot does not pull back up to the groove.
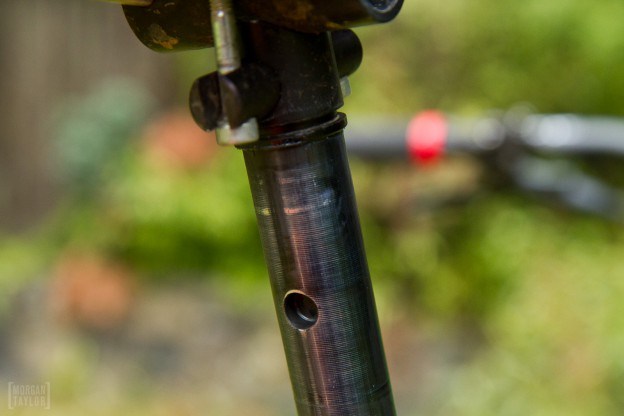
The Turbo unit engages a pin which sits in one of three holes; this is the hole for the 5″ drop position.
Then, when I pushed the lever to let the post up the last inch, there wasn’t enough spring pressure to pull the boot up to its groove. The boot, stretched by the spring but stuck on the larger diameter lower tube, actually prevents the post from going high enough: I had to either push it right to the bottom again and re-release, or pull it up by hand or with your knees. From full drop to the top was never a problem.
After experiencing these two issues, and feeling like they were both related to the boot, I decided to pull the boot off. My inclinations were correct: the physical problems that were occurring completely disappeared. A bit of googling will find other users who have done exactly the same thing. (And, apparently, one of Gravity Dropper’s biggest dealers doesn’t sell a single post with a boot.)
Now I’ve seen track racers permanently removing the dust caps from their looseball hubs and oiling the bearings by hand to eek out the lowest possible rolling resistance. Of course, these people use their bikes only in completely dry conditions, mostly indoors – definitely not the treatment I was to put the bootless Gravity Dropper through.
Half way through the first ride without the boot, on rainy North Shore day, the post seized up altogether. The crunching of foreign shrapnel between the inner and outer tubes was like nails on a chalkboard. Considering that the internal system is not sealed and the pin holes negate the purpose of a sealed system anyway, there is no way you could run one of these posts without a boot in a wet climate.
After the failed bootless experiment I did a quick clean and re-grease to get the post back in proper running order. This is the beauty of the simple mechanical system: within 15 minutes, you can go from a piece that seems destined for the trash bin to a perfectly functioning unit. Gravity Dropper uses Slick Honey but all I had was plain old white lithium grease, which works just fine.
When I reinstalled the boot, I decided to smear a small amount of grease around the inside of it. Immediately the resistance felt at the bottom of the range was decreased: I was able to operate the post into all positions by hand. Back on the trail with the boot, the aforementioned top of range stickiness from the 1” to the top position was still there, but eventually subsided. The boot essentially needed to break in.
So far I realize this review has focused on my own personal nitpicks and a couple of oddball issues. That’s because, other than these issues, the post has performed flawlessly – and that’s the experience that Gravity Dropper owners will often relate. Servicing the post yourself is dead simple, and once it’s clean and lubed, it doesn’t require much in the way of maintenance. The design is somewhat industrial in appearance but the build quality is very much acceptable even by increasingly picky standards.

The plus side to the industrial nature of Gravity Dropper’s products is they are indeed tough. With all but a few small bits of hardware produced in their Montana facility, and a great (read: quick and inexpensive) in-house service program, the durability of the products is compounded by quick repairs when necessary. Most riders who swear by Gravity Dropper’s products are not afraid of pulling them apart when necessary.
The new Gravity Dropper sees some well thought out refinements made to the longstanding platform, and it continues to be a reliable and easily serviceable choice for those who aren’t bothered by the aesthetic issue of the boot. The Turbo LP runs for $325 US.
Gravity Dropper has dedicated supporters for good reason, but are they being left behind in today’s competitive market?




Comments
Andrew Major
10 years, 2 months ago
@Morgan : Shoreboy's KS barrel would be the cleanest way to do it, as the barrel would but up right against the remote lever and, once tension was right, you could clip the cable flush; I also looked at a few old Canti brake bits with holes that would work.
My rotor bolt/washer/nut job was originally a test of concept that works perfectly and looks bodged (which I enjoy) but there are definitely way cleaner ways to do it.
You do have to admit that the gold Saint barrel adjuster really makes the package though…
-D
Reply
Shoreboy
10 years, 2 months ago
I used the cable securing nut thing from the end that normally goes at the seatpost end of a ks i950/i900. I just pulled it tight, checked the tension and clipped it off. I filed it smooth with a dremel, and it was great. Has just the right amount of throw to engage/disengage the pin on the GD.
Reply
Andrew Major
10 years, 2 months ago
I really like my current Gravity Dropper - the latest version with the bolt-on housing guide a la the post reviewed.
The company has Awesome Customer Service, and it takes 30-seconds (tool free) to un-thread the cap, pop the the post out by engaging the remote, and grease the bushings for almost-play-free performance. It is so easy to work on that any one who can change a shifter cable can fully rebuild it.
That said, I think that Morgan should win Olympic Gold for ice dancing around how awful the remote is, and it has nothing to do with adjustable cable tension which can be remedied in 5-minutes or less by adding an inline barrel adjuster.
The remote needs more leverage and a return spring to assist the post's tiny inline spring. In terms of mimicking the smooth function of competing products some kind of bushing or bearing would go a long way as well.
Here is my Fox DOSS remote (easily run on either side, above or below the bar), which has awesome ergonomics, and super smooth performance thanks to the three features above:
Reply
boomforeal
10 years, 2 months ago
looks like you bodged a cable end on the remote side using a nut/washer/bolt. did you have to use 4mm housing, and if so how did that play with the remote and inline barrel adjuster?
Reply
Andrew Major
10 years, 2 months ago
Its just a rotor bolt / washers / nyloc nut holding the cable.
I always use Shimano 4mm housing w/ stainless steel cables. It interfaces perfectly with the Gravity Dropper post, inline barrel adjuster and remote.
-D
Reply
Morgan Taylor
10 years, 2 months ago
So you haven't even used a bolt with a hole through it… interesting. Similar to the way a derailleur clamps. I've got a couple of knarp-type-things in my tool box from BMX projects way back, will probably sort something like this out.
Reply
Shoreboy
10 years, 2 months ago
I modified a KS lever to fit on mine, worked great.
I have since bought a LEV, but GD makes a great post.
Reply
Kyle Doherty
10 years, 2 months ago
I found there is an optimal rotation for the boot. If you align the seems of where the two pieces of the boot were bonded together so that they line up along the long axis of the bike, the boot will compress more easily.
If GD could 1) make a prettier boot and 2) make a more ergo lever, these posts would be very competitive. A light neoprene sock would be awesome. Maybe widen the grooves where the ends of the boot snap in currently, enough to zip tie the sock on.
Any chance your friend who modified the DOSS lever would be willing to post a tutorial? That sounds ideal!
Reply
Andrew Major
10 years, 2 months ago
Also posted below… no tutorial required.
I used: 1x Fox DOSS Remote, 1x Rotor Bolt, 1x Nyloc Nut, 1x Washer (mine is off a front derailleur and has a nifty bent shoulder).
In addition to the DOSS barrel adjuster I run an inline barrel adjuster for maximum tune-ability… but it isn't necessary, the remote's barrel adjuster has more then enough adjustment to pre-load the cable.
Reply
Rob Gretchen
10 years, 2 months ago
Good review. I agree with your assessment of the Turbo. My first foray into dropper posts was on these and they did their job well, BUT the world has moved on. I really think GD needs a new design if they are going to stay in the game.
Reply
Please log in to leave a comment.