
First Date: Easton Haven and Havoc Wheels
Stuart Kernaghan and Dan Austin have tag-teamed Easton’s wheelset offerings in the AM/FR market. This NSMB.com First Date includes an introduction to the Haven and Havoc wheelsets, as well as a how-to on swapping the rear axle between QR and through axle configurations.
Easton Haven and Havoc Wheelset – Double Date
Once upon a time, not all that long ago, almost every aftermarket mountain bike wheel was a custom creation. It was the only option. You’d go into your local shop with a specific rim, hub, spokes and spoke nipples in mind, based on your riding style, talk to the man behind the counter and come back in a few days to pick up your new wheel. You’d pay your money and cross your fingers that the guy spinning the spoke wrench actually knew what he was doing. Usually things worked out fine, but they didn’t always.
Then, aftermarket wheels started making their way into the market. It was a nice idea – walking into a shop, picking a wheel based on your needs, and throwing it on your bike right away – but they were often very pricy and not quite what you were looking for. The mass market appeal and acceptance just wasn’t there.
Fast forward to today. There are now a plethora of pre-built wheels and wheelsets available to choose from. A quick look through the catalog of one online bike retailer shows pre-built wheels from 27 different manufacturers, ranging in price from about $200 for wheelset of very basic mountain bike wheels all the way up to $2,800 for a set of wheels with carbon rims. In other words, pre-built wheels for just about every application and every budget.
One of your options for pre-built wheels is Easton, which offers 16 different wheelset for XC, all mountain and downhill riding. We decided to do a long-term, head-to-head test of one set of Haven AM wheels and one set of Havoc light DH wheels to see how the two stacked up, and if one was a better option than the other based on tester weights, riding styles and terrain. First, the breakdown on the two wheelsets. Here are numbers:
| Details | Haven | Havoc |
| Wheel Sizes | 26″ | 26″ |
| Finish |
Brushed mag or brushed black |
Grey or Orange |
| Wheelset Weight | 1650gr | 1750gr |
| Type | Clincher / UST | Clincher / UST |
| Rim Material | Easton Aluminum | Easton Aluminum |
| Internal Rim Width | 21mm | 23mm |
| External Rim Width | 26mm | 28mm |
| Spokes | Sapim 2.0/1.7/2.0 black | Sapim 2.0/1.8/2.0 black |
| Front Spoke Pattern | 24-3X | 24-3X |
| Rear Spoke Pattern | 24-3X | 24-3X |
| Nipple Type / Color | Easton / Ano Black | Easton / Ano Black |
| Front Hub Type | M1 / 6-bolt disc | M1 / 6-bolt disc |
| Rear Hub Type | M1 / 6-bolt disc | M1 / 6-bolt disc |
| Pawls / engagement | 3 pawls, 12° | 3 pawls, 12° |
| Front Axle Size | 9x100QR, 15×100, 20×110 | 20×110 |
| Rear Axle Size | 10X135QR, 12×135/142 | 10X135QR, 12×135/142 |
| Bearing Type | cartridge | cartridge |
| Price | Front – $445 / Rear – $500 | Front – $445 / Rear – $500 |
And then there were the riders…
Stuart – 6′ 4″, 230 lbs, riding since 1995. Like riding all-mountain, don’t mind riding uphill as long as no one’s in a rush, shuttle every now and then, ride bike parks and do long road rides. The Havens are currently mounted on a highly-modified Giant Reign. They may move to another frame with a rear thru axle, before the test ends. Living in Vancouver, riding the North Shore and Squamish. Don’t spend much time in the air, but hard on gear because of my size.
Dan – 6′ 1″, 195 lbs, riding since 1987. Likes all-mountain riding, not afraid to hit drops on a 6″ bike, puts in some days in the bike park as well as shuttles. Not afraid of pedalling up. Lives in Vernon, BC, and rides the North Okanagan Valley. Testing the wheels on a Marin Attack Trail, perhaps another frame if the winter snows melt soon enough. Not afraid to go bigger on a 6″ bike, launch off stuff and hit drops.
Now, on to the wheels themselves.
The Havens
Words and Photos by Stuart Kernaghan
Due to some issues lining up a frame with a 142mm rear end, I was forced to switch the rear hub on the Havens from the 135/142 axle to a standard QR rear axle. This isn’t necessarily what Easton had in mind when they built these wheels, but it’s very cool to know that that degree of flexibility is possible. Details and photos for the axle swap are there in all their glory below the Havoc wheels.
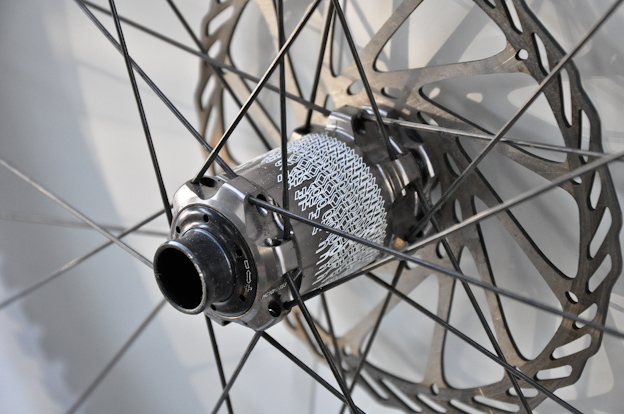
With spec neatly laid out above, I can jump right into the details. I slipped a set of WTB Bronson 2.3” tubeless tires onto the Haven rims – the first bead went on without any trouble at all and the second bead only required a little assistance with a plastic tire lever – added two scoops of Stan’s sealant and inflated with a floor pump. Installing rotors was also a piece of cake, thanks to the mirror-like surface on the outside edge of the hubs and cleanly machined threads.
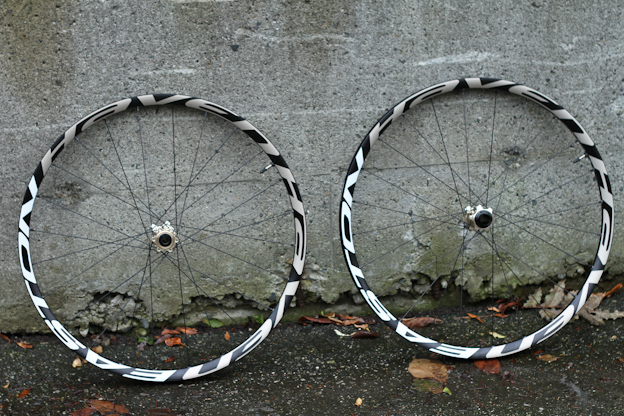
The Easton Havens, fresh out of the box and completely naked. The graphics on these wheels are extremely bold, but they add to the overall appeal of the package.
The beads on the tires seated quickly, and there were no issues with the tires holding air during the initial inflation. They also seemed to mount without the high-pressure snapping that you get with some tubeless tire and rim combinations. The same tires on a set of Shimano XT rims were considerably noisier when the bead snapped into place, and seemed to take much longer to get seated in the first place.
It’s possible to adjust the bearing tension in the 20mm front hub.
I’ve been riding on the Havens for a while now, and they’ve behaved very well. They’re light enough to make the bike feel more lively than it does with other wheelsets, without being fragile. I’m carrying a bit of winter weight right now and topping the scales at about 230lbs. and the Havens don’t seem to be complaining about that in spite of the fact that they’re only 24-spoke wheels. Flex has been very minimal, and there are no flat spots so far. Spoke tension is always a good indicator of wheel build quality, and so far everything is holding tight.

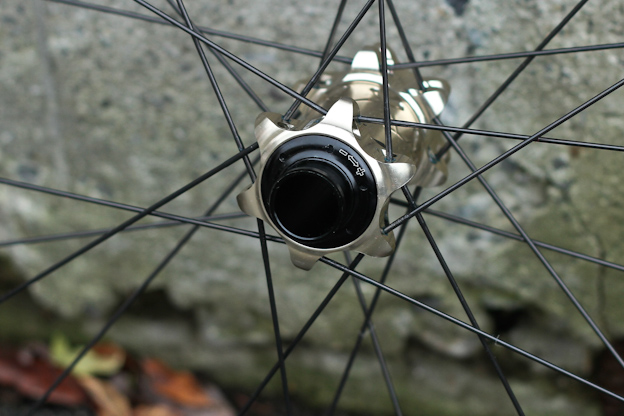
The rear hub, fitted with the 10 x 135mm thru axle and end cap. It’s also possible to externally adjust tension on the rear hub (on the non-drive side). The hex fitting allows you to remove the axle quickly and easily.
My big concern with most components on the Shore is long-term durability in the muck and mud, as well as their ability to withstand constant abuse from the roots and rocks that litter the trails. All of these thing tend to wear down components and bearings, especially when you put them under an *ahem* larger rider.
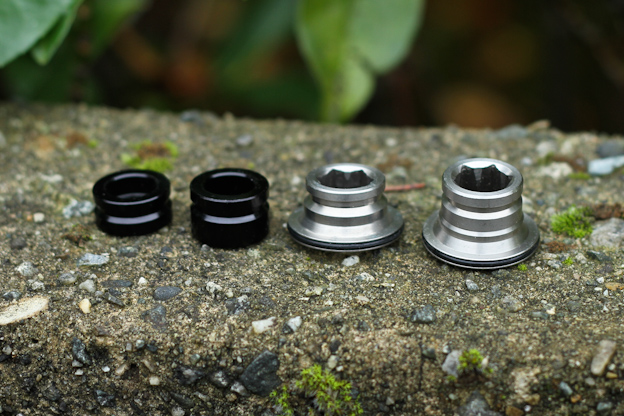
The two different sizes of end caps ship with the wheels. It makes it possible to set up the wheels for your current frame, or any other frame that you may buy in the future. The o-rings at the base of the end caps hold them in place.
I’m going to continue riding, rinsing and repeating with the Havens for the next few months. That means months of really wet, sloppy and punishing conditions that can savage most mountain bike components. Maintenance will likely consist of an occasional wash, if I can find a working hose (there are drawbacks to living in an apartment). I may check spoke tension, too, if I remember. I’ll report back after the thrashing is complete.
MSRP on the Havens is US$945. Check with your local bike shop for Canuck prices.
Easton Havoc Wheelset
Words and Photos by Dan Austin
As Stuart noted, Easton wheels come in many flavours and the Havoc is one of a rainbow of options offered. The main difference between the Haven and Havoc lines is that Havens are aimed at all-mountain riding while the Havocs are pitched at DH and freeride fans.
There are three Havoc 26” wheelsets to choose from in Gravity line of Easton wheels: the Havoc DH, a new Havoc UST (tubeless) 150mm version and the model I’m testing, the standard Havoc wheelset.
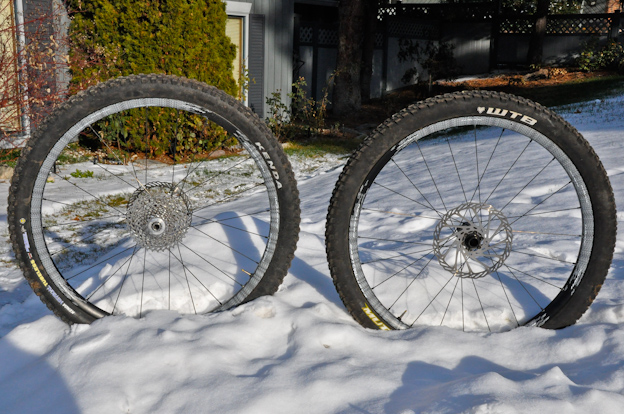
The Havoc wheels, chilling in some early winter snow in the Okanagan. Graphics are a little more low-key than the Havens, but very slick.
The Havocs have been around for a little while, but the 2011 version is 150g slimmer than last year. They’re built on UST tubeless ready aluminum hoops with Easton’s Threaded Eyelet system, laced to Easton’s wide bodied, cartridge bearing M1 hubs. Easton uses 24 double butted, straight pull Sapim spokes laced in a three-cross pattern and its Threaded Eyelet System, which connects the spoke nipples to the rim with threaded eyelets that don’t pierce the rim bed.
The Havoc front hub has a different look to it than the Haven, as well as different graphics, but it’s the same basic design.
Easton wheels have always been built to exacting standards, and this particular wheelset is no different. The Havocs are precision trued acoustically, resulting in wheels so straight you can survey from them. You’ve got the choice of 10 x 135QR or 12 x 135/142 rear end configurations, so the Havocs will fit any XC or AM ride you have in the stable. Riders with DH rear ends should check out the new 150mm UST Havocs.
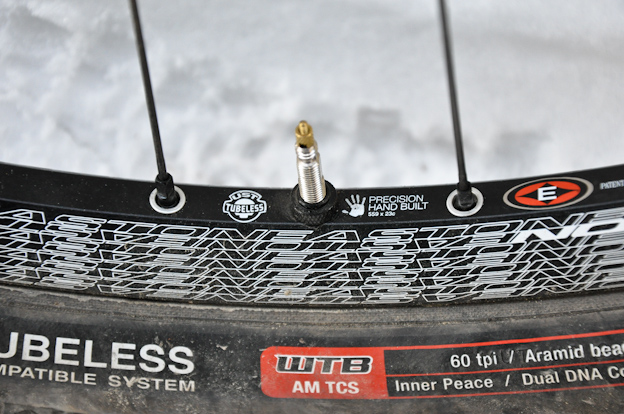
The Havocs also have their own graphic style on the rim. The valve stem is your standard tubeless set-up, with the all-important UST stamp of approval.
Assembling the Havocs was a simple process. Rotors and cassette mounted easily on the hubs, as expected. Surprisingly, the fact that this was my first experience with tubeless wheels didn’t complicate the installation process. The Easton UST tubeless system is a no brainer to set up, inflate and ride. With my hands, a set of tubeless tires (a WTB Mutano in the front and a Kenda Nevegal in the rear), a single plastic tire lever, some Stan’s sealant, a floor pump and a little direction, I had the Havocs ready to roll in less than 10 minutes. Once everything was mounted on the wheels, the 20mm front and 12 x 142mm dropped into my 2011 Marin Attack Trail and I was ready to ride.
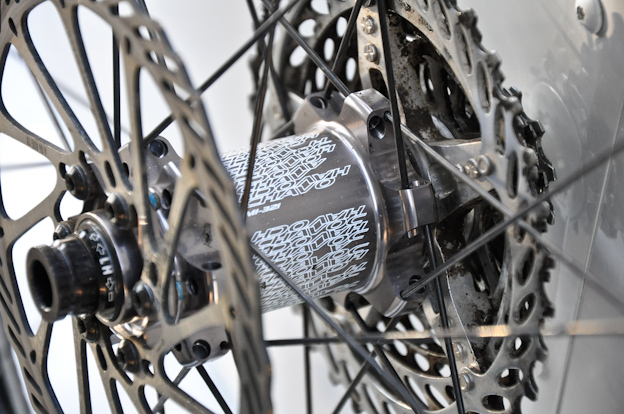
The 12 x 142mm rear hub, completely geared up and ready for action. Note the straight pull spokes and bearing tension adjustment on the non-drive side.
My initial impressions are as you’d expect from a wheelset of this calibre. They are undoubtedly light, which is immediately noticeable on the trails in light handling and quick acceleration. Strong and straight, these wheels give you the confidence to ride trails as hard and fast as you like.
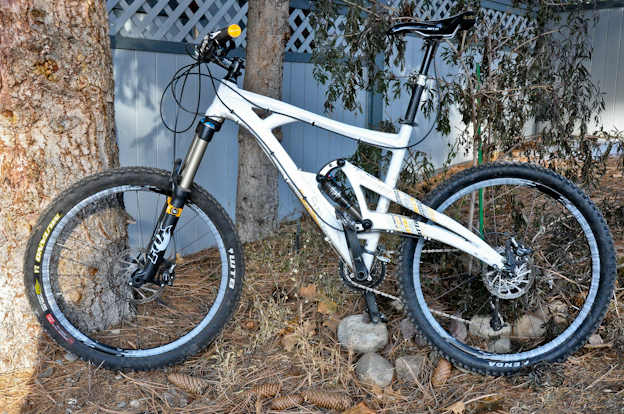
The Havocs installed on the Marin Attack Trail, ready for action.
In an unexpected test induced by a high-speed bar contact with a tree that saw the bike come to a very sudden stop and me being pitched into the bushes, I was happy to see that my front tire was still properly seated, fully inflated, hadn’t burped and was ready to go. Unfortunately, I wasn’t quite as quick to recover from my unanticipated dismount.
This little incident showed me that tires don’t seem to unseat easily, and that the Havocs won’t let you down when you really need them. I’m still trying to find the perfect working pressure, but I’m already seeing that the tubeless system allows for a greater range in tire pressures than traditional tubed systems.
It’s obvious right off the bat when you first pull these wheels out of the box and then build them up that Easton’s commitment to quality is exceptional. You can’t always guarantee a great ride experience from any pre-built (or shop built-wheels, for that matter), but the Havocs are certainly properly put together. It’s nice knowing that all the parts that go into the Havocs, from hoop to hub, are designed to work together in harmony with the aim of providing solid, long-term performance.
How they hold up to a few months of abuse on dry, dusty, rocky, rooty Okanagan trails remains to be seen, but I’m going to do my best to find out. With an MSRP of US$945 I’d certainly expect these hoops to last a good while. Only time will tell, though– then I’ll tell you.
Check with your local shop for Canadian prices.
Swapping Out the Haven or Havoc Rear Axle
Words and Photos by Stuart Kernaghan
Switching the rear axle on a set of Easton MTB wheels is a straightforward process. It required the purchase of a 20mm cone wrench and a 12mm hex wrench, as well as the necessary parts from Easton.
The three sentence version of the process is as follows: Remove end caps that are held on with a clever but simple o-ring system, hold one end of the axle with the 20mm wrench and use the hex wrench to unthread the other. Slide out the old axle body, slide in the new one, tighten it up, put on the new end caps for 10 x 135mm rear end spacing and you’re good to go. It took less than 10 minutes, and now I have a set of wheels that I can run with virtually any new or old XC or AM frame.
Steps for swapping over the rear axle, along with highly illustrative and useful photos, are below:
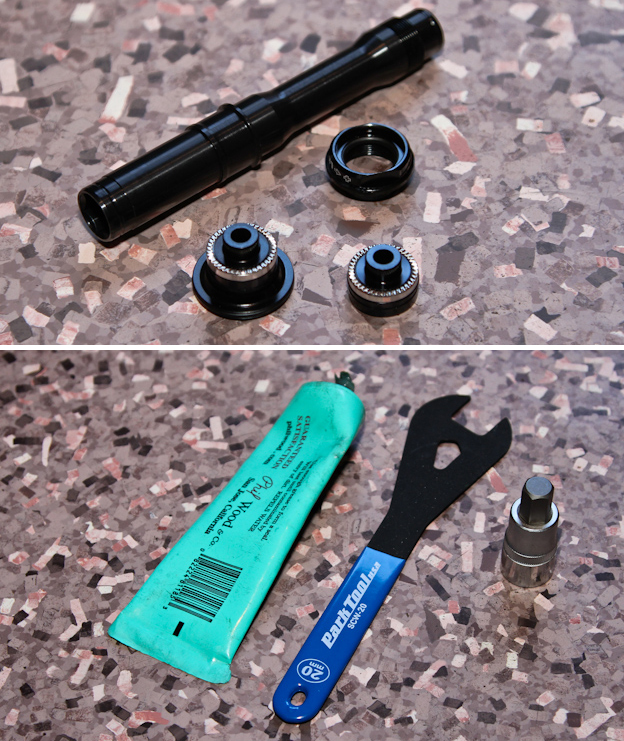
Step 1: gather the parts (top), including the new 135mm QR axle, two QR end caps and threaded tension nut. Then assemble the tools (bottom) – grease, 20mm wrench and 12mm hex tool, in this case a socket.
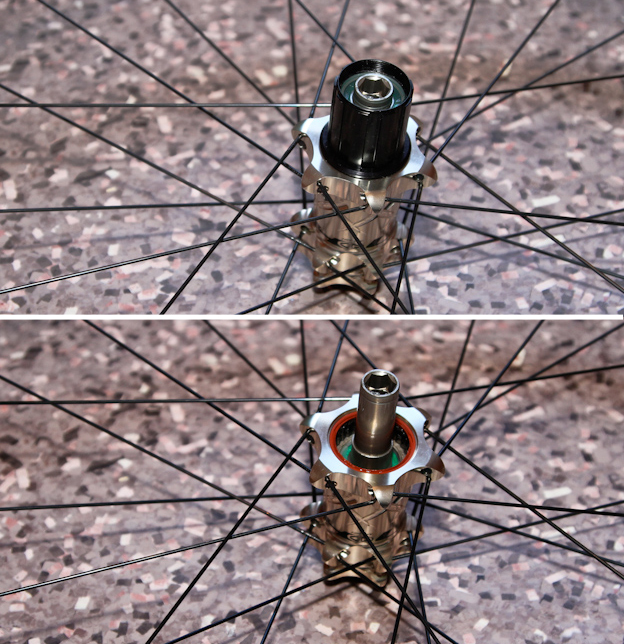
Step 2: Pull off the end cap on the drive side, then the cassette body.

Step 3: Slide the 20mm wrench over the non-driveside end cap, and loosen the axle.
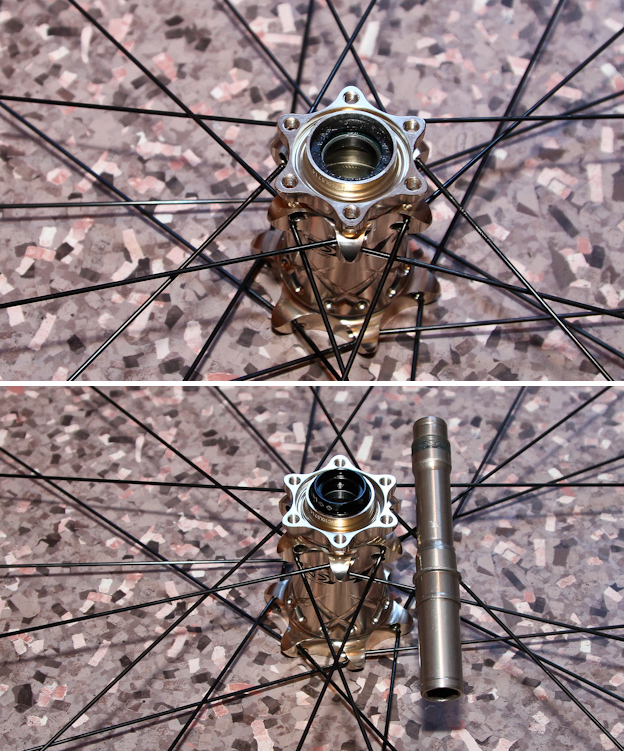
Step 4: Remove the axle (bottom), and then the non-driveside end cap that you held in place with the wrench (top, prior to removal). This is what you’ll be left with.
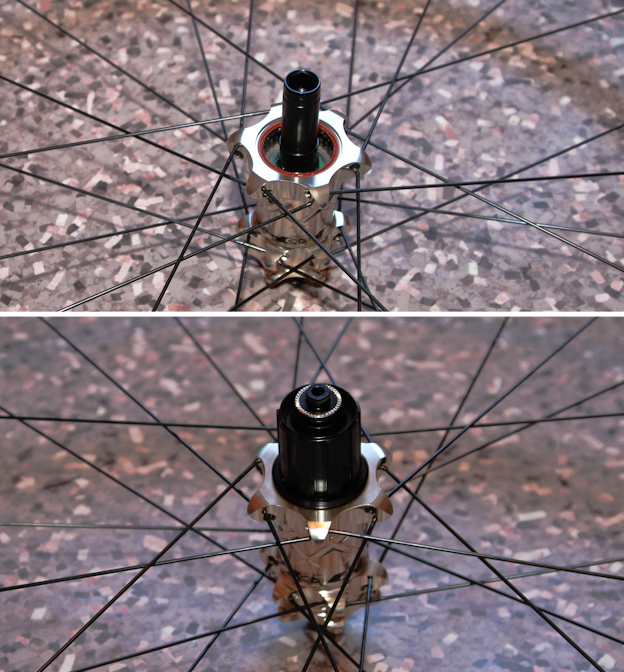
Once you’ve done that, attach the non-driveside QR end cap (not shown), install the QR axle (top), slide the cassette body over the axle, install the driveside end cap and tighten the entire assembly. Once you’re done (bottom), install the cassette, throw in the QR skewer and you’re ready to rip.
The best thing about these wheels is that it’s just as easy to change the rear wheel to whatever axle configuration I want now that I’ve got the parts and tools. I can also switch the front hub to a 15mm axle, if I want.
You’d think that kind of a conversion would be fairly straightforward and possible on all wheelsets, but it isn’t. The Shimano XT wheelset that I’m currently testing on a different bike is 15mm / 135mm only. If you change frames or fork, you need different wheels. Which is a costly proposition at about $500 per wheel. Big props to Easton for making the easy axle swap possible.
Stuart and Dan have done their homework with the Easton wheels, and are now ready to give them a right thrashing. The how-to section on swapping the rear axle is a cool bit of bonus tech. Have you spent much time on Easton hoops? Let ‘er fly below…
The NSMB.com First Date is a brief overview of a product’s specifications, as well as our initial impressions both on paper and in-field. It also covers how the marketers and engineers have pitched the product and how they intend to see it used – plus how we intend to test it, where it is being tested, and how long we expect to be testing it for. This is not a full review of the product yet but provides the background for a forthcoming review and allows reader feedback – perhaps there is something specific that readers want to find out about this product and the further review stages can address that.


Comments
Please log in to leave a comment.